Advanced Security with Pre-signed URLs
In this section, you'll implement pre-signed URLs to enhance your file storage security. Pre-signed URLs provide temporary, secure access to files without exposing your storage credentials.
Understanding Pre-signed URLs
What are pre-signed URLs? Pre-signed URLs are temporary, secure links that allow users to upload or download files directly from R2 without exposing your storage credentials. Think of them as temporary passes to access specific files.
Why use pre-signed URLs?
- More secure - No need to expose storage credentials
- Better performance - Files go directly to/from R2, not through your backend
- Temporary access - Links expire after a set time
- Reduced bandwidth - Files don't pass through your Worker
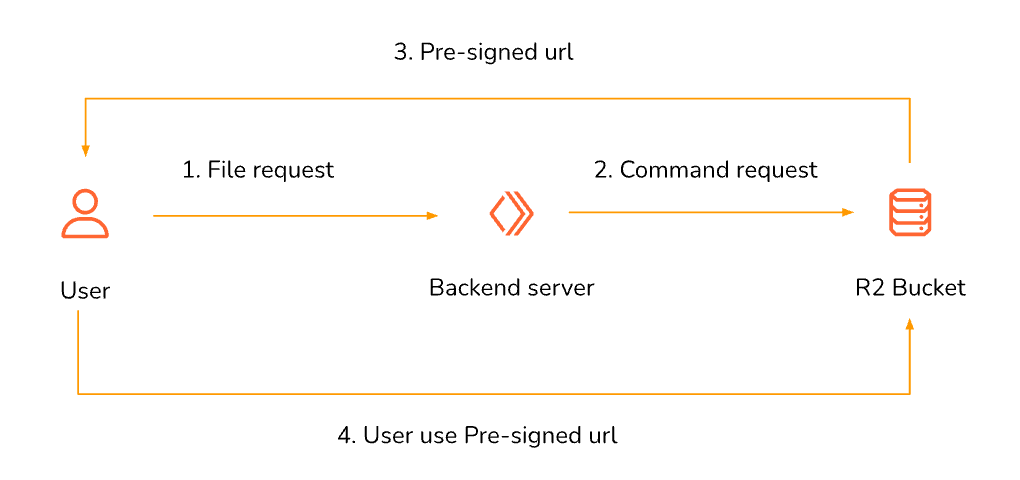
How they work:
- User requests file access
- Backend generates temporary URL with signature
- User uses URL to access file directly from R2
- URL expires after set time period
Pre-signed URL vs Direct Upload
| Method | Security | Performance | Bandwidth Usage |
|---|---|---|---|
| Direct Upload | Lower | Slower | Uses Worker bandwidth |
| Pre-signed URLs | Higher | Faster | Direct to R2 |
Prerequisites
Before starting, ensure you have completed:
- R2 Bucket Setup - Bucket created and configured
- File Operations - Basic CRUD operations working
- Basic file upload/download tested successfully
Step 1: Install Required Packages
Understanding S3 SDK
Why AWS SDK? R2 is compatible with Amazon S3 APIs, so we can use the AWS SDK to work with R2. This provides:
- Pre-signed URL generation
- Advanced file operations
- Familiar S3 tooling
- Easy migration from S3
Install AWS SDK
Add the AWS SDK for S3 compatibility:
npm install @aws-sdk/client-s3 @aws-sdk/s3-request-presigner
Expected output:
added 2 packages, and audited 123 packages in 2s
Step 2: Set Up Environment Variables
Understanding Required Variables
You'll need these environment variables to use the S3 API with R2:
| Variable Name | Value | Purpose |
|---|---|---|
R2_BUCKET_NAME | blazenote | Your bucket name |
R2_ENDPOINT | https://xxx.r2.cloudflarestorage.com | R2 API endpoint |
R2_ACCESS_KEY | Your access key | Authentication |
R2_SECRET_KEY | Your secret key | Authentication |
Create API Token
To get the R2 access & secret keys. View the video and use the checklist to help you complete the task.
Open your Cloudflare Dasboard ➞ R2 Object Storage
Click on the API.
Click Create Account API Tokens
Enter the Token Name, select Object Read and Write in the permissions and choose the bucket, then click Create Account API Token.
Copy the Access Key ID and Secret Access Key (Save it in notepad)
Now, get your R2's S3 compatible endpoint url by following this guide:
Open your Cloudflare Dasboard ➞ R2 Object Storage
Click on the API and click on Use R2 with APIs
Copy the S3 API endpoint URL (save it in notepad)
Add Environment Variables
Add variables using Wrangler (recommended):
# Add each variable as a secret (you'll be prompted for the value)
npx wrangler secret put R2_BUCKET_NAME
npx wrangler secret put R2_ENDPOINT
npx wrangler secret put R2_ACCESS_KEY
npx wrangler secret put R2_SECRET_KEY
⚠️ Important: These must be added as Secrets, not regular environment variables, to keep your credentials secure.
Secrets added via wrangler secret put are NOT injected into your local environment by default. To use these secrets locally, you must add them to a local environment file.
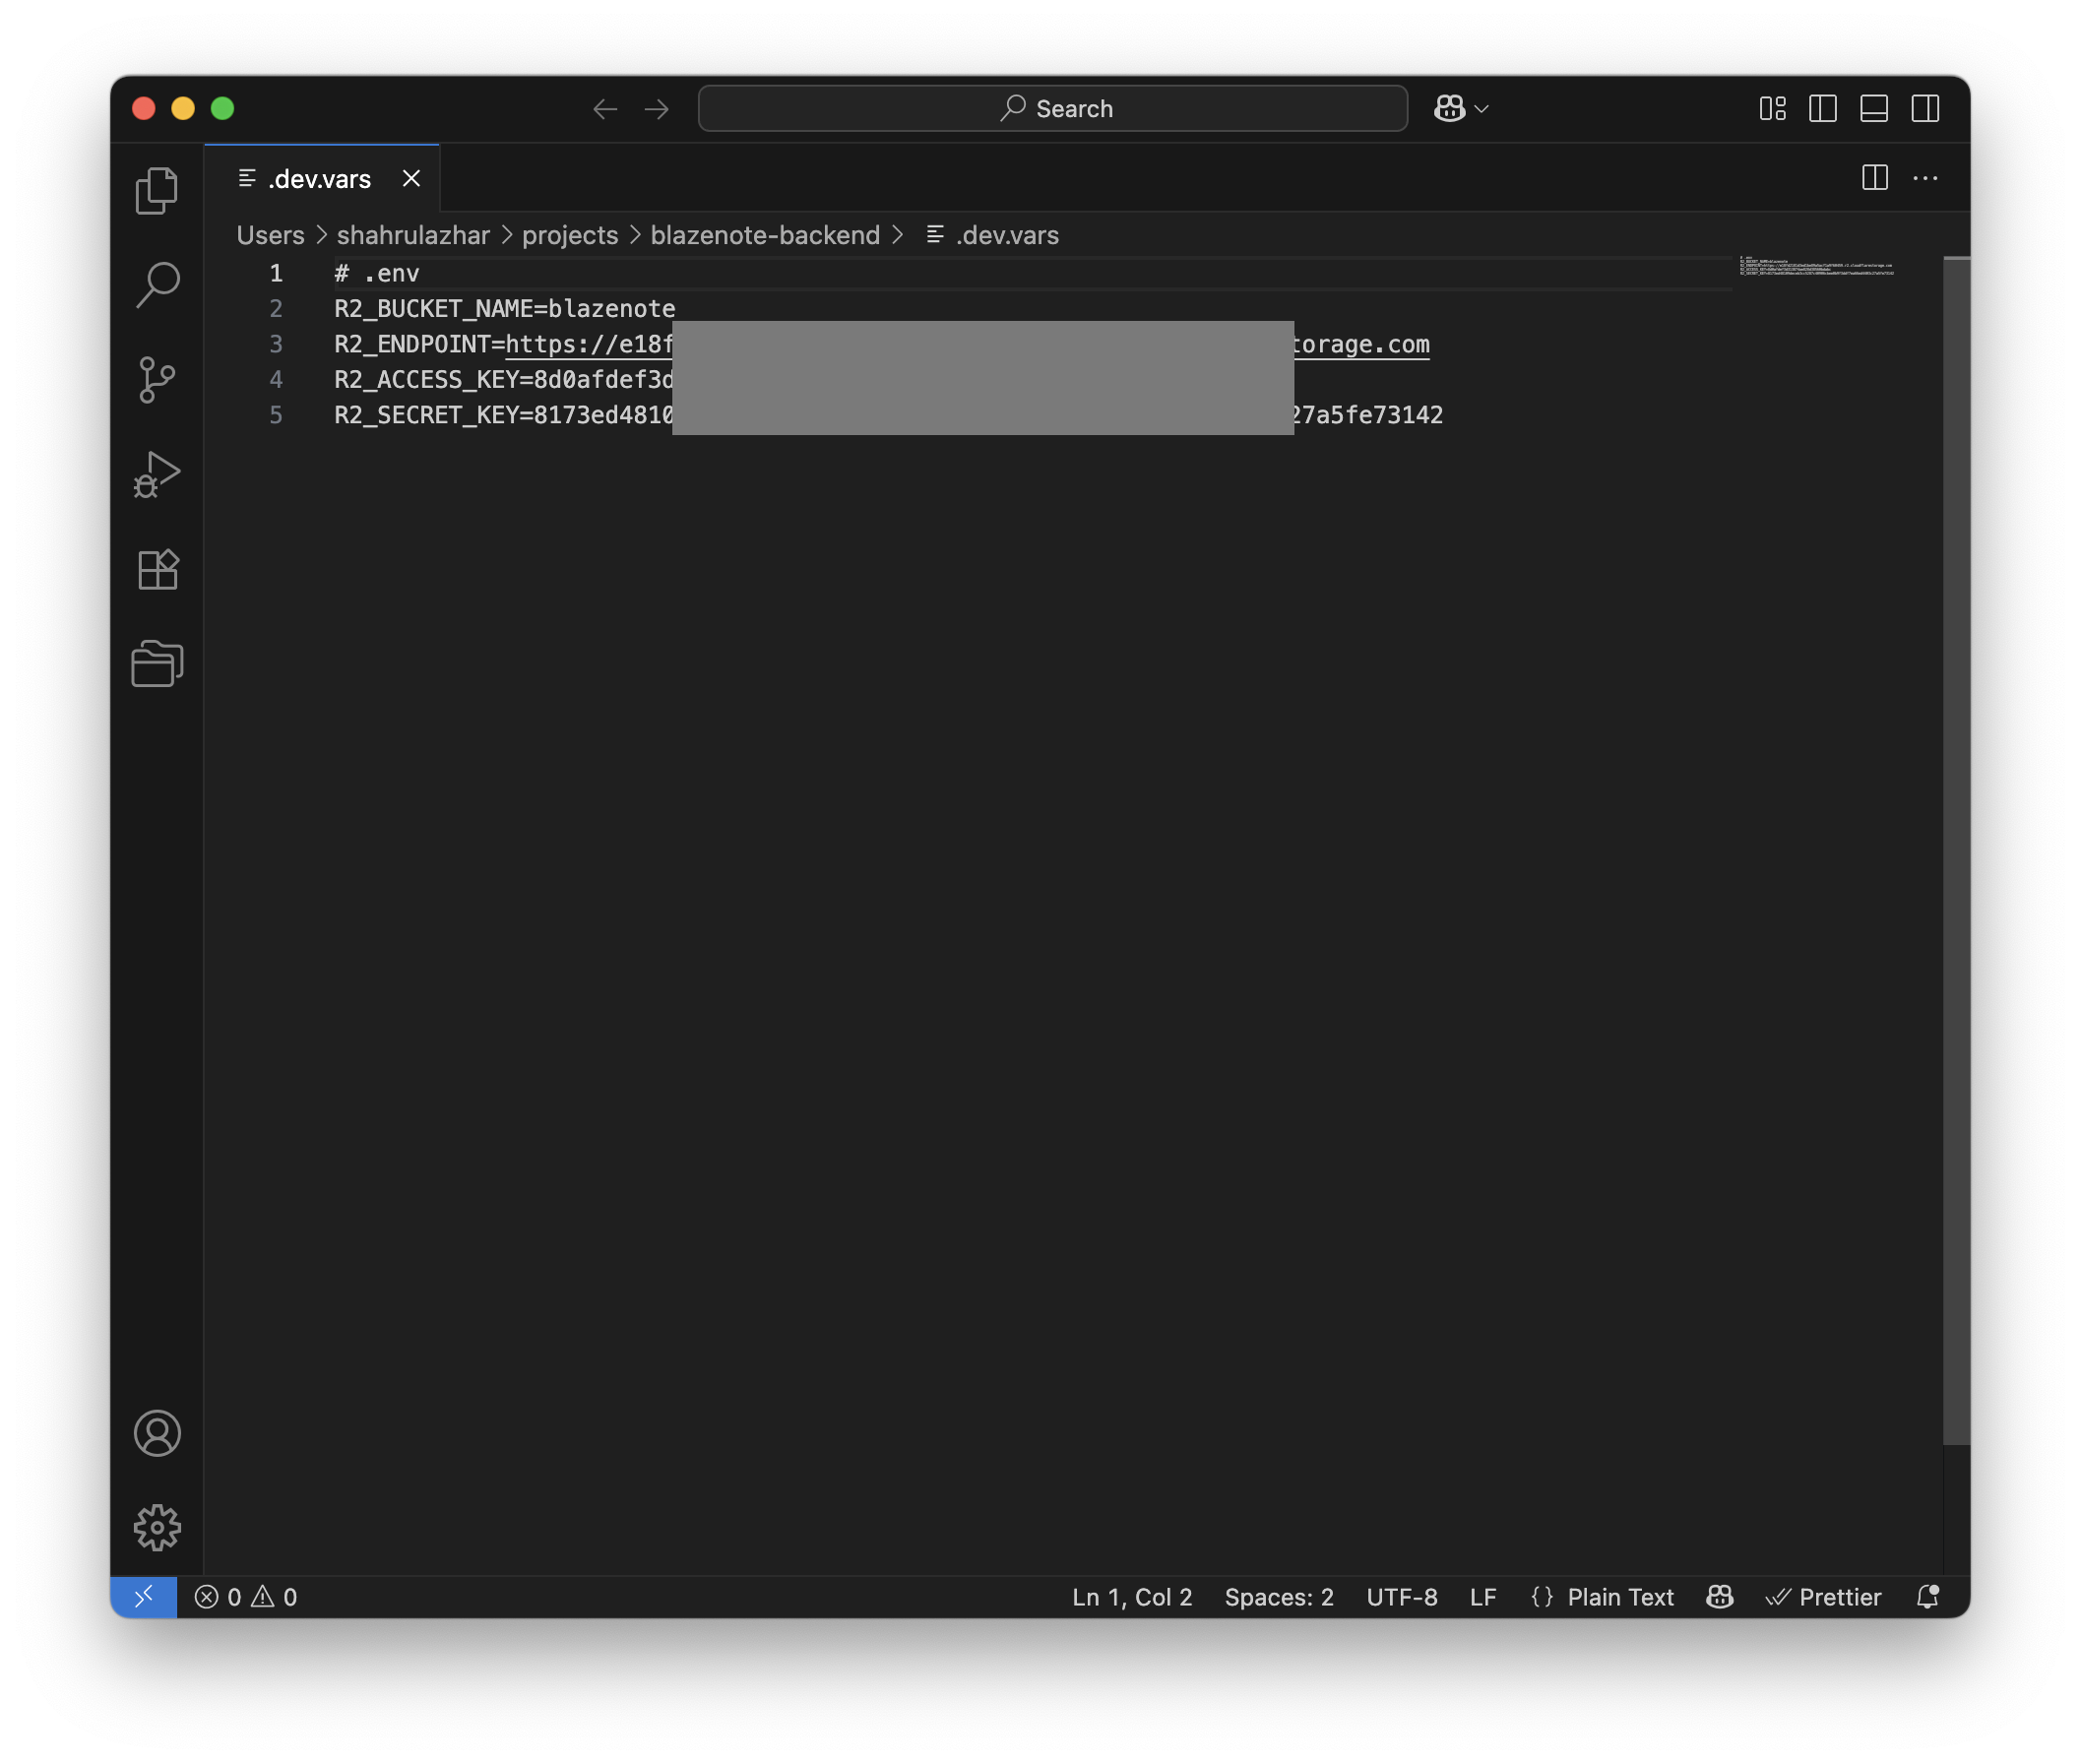
Create local environment file:
# ensure you're in blazenote-backend directory

touch .dev.vars

code .dev.vars
Insert the following variables into the file:
R2_BUCKET_NAME=blazenote
R2_ENDPOINT=https://xxx.r2.cloudflarestorage.com
R2_ACCESS_KEY=your_access_key
R2_SECRET_KEY=your_secret_key
Step 3: Create S3 Client Helper
Open Files Route
Open the regular files route (not files-workers):
code src/routes/files.route.ts
Add S3 Client Setup
Find the line with (go to line 3):
import { ContextExtended } from "../types";
Add the following code below it.
import {
  S3Client,
  PutObjectCommand,
  GetObjectCommand,
  DeleteObjectCommand,
} from "@aws-sdk/client-s3";
import { getSignedUrl } from "@aws-sdk/s3-request-presigner";
Then, find the line with:
// Helper to init the s3 client
function createR2Client(ctx: ContextExtended) {}
Replace it with this code.
// Helper to init the s3 client
function createR2Client(ctx: ContextExtended) {
  const r2 = new S3Client({
    region: "auto",
    endpoint: ctx.env.R2_ENDPOINT,
    credentials: {
      accessKeyId: ctx.env.R2_ACCESS_KEY,
      secretAccessKey: ctx.env.R2_SECRET_KEY,
    },
  });

  const bucket = ctx.env.R2_BUCKET_NAME;
  return { r2, bucket };
}
Your final code will look like this:
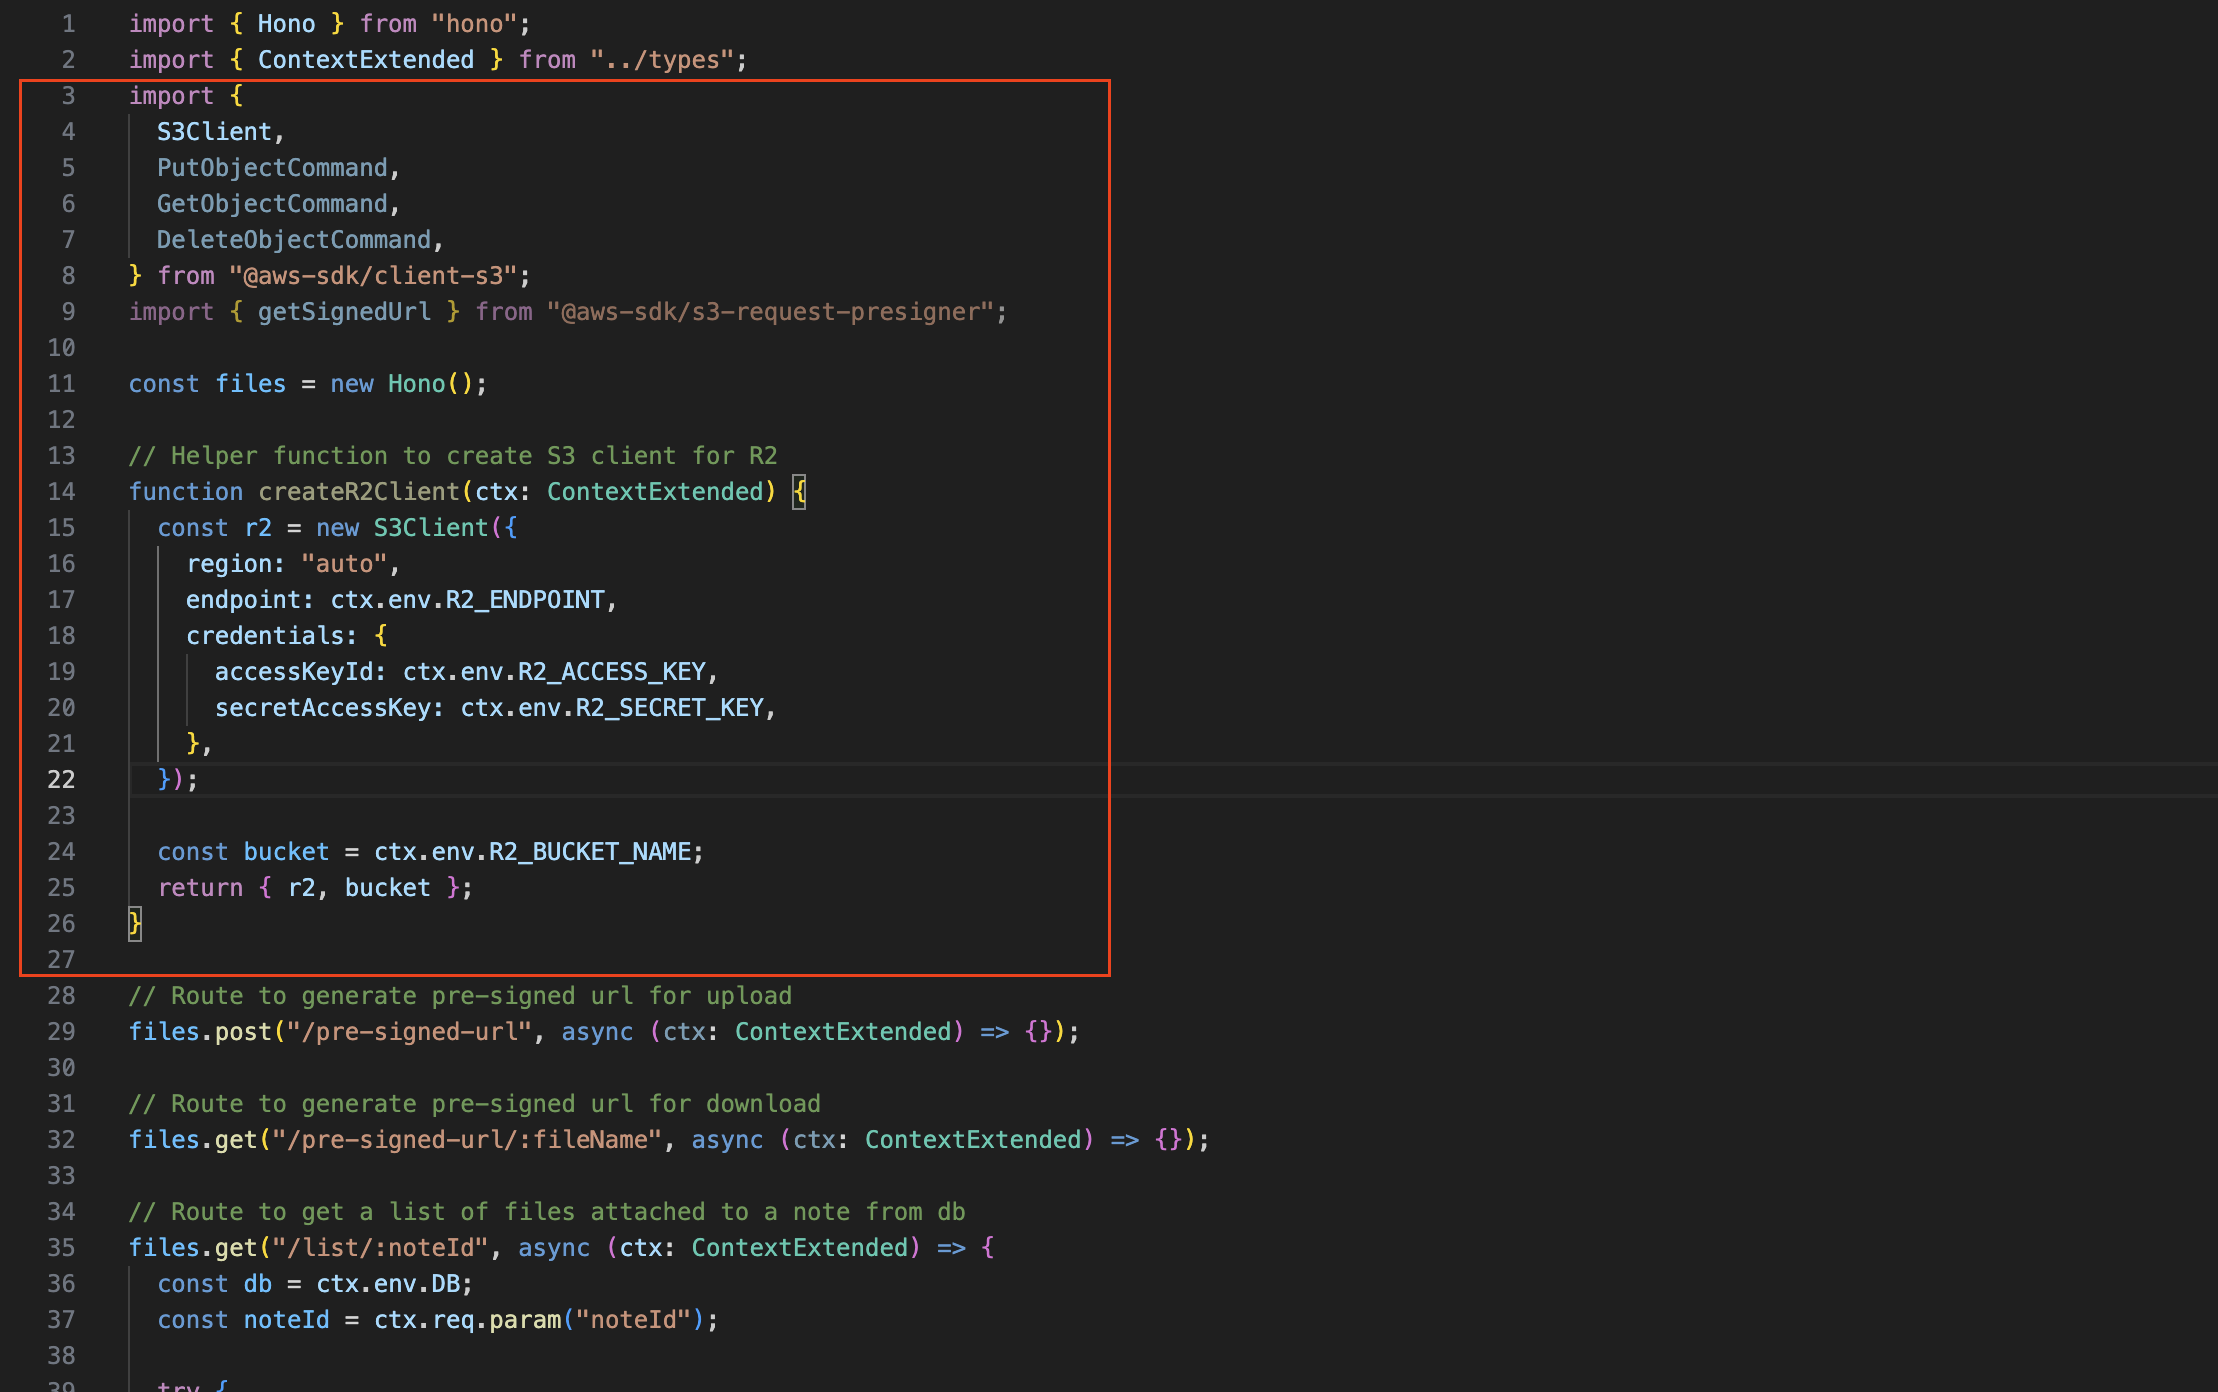
What this helper does:
- Creates S3 client configured for R2
- Uses your R2 endpoint and credentials
- Returns both client and bucket name for convenience
Step 4: Add Pre-signed URL for Upload
Understanding Upload Pre-signed URLs
Upload pre-signed URLs allow users to upload files directly to R2 without going through your backend. This is more secure and performant.
Add Upload Endpoint
Find this placeholder code (somewhere at line 29):
// Route to generate pre-signed url for upload
files.post("/pre-signed-url", async (ctx: ContextExtended) => {});
Replace with this code:
// Route to generate pre-signed url for upload
files.post("/pre-signed-url", async (ctx: ContextExtended) => {
  try {
    const { r2, bucket } = createR2Client(ctx);
    const { fileName } = await ctx.req.json();

    // Create unique filename with timestamp
    const fileExtension = fileName.split(".").pop();
    const baseName = fileName.replace(`.${fileExtension}`, "");
    const timestamp = Math.floor(Date.now() / 1000);
    const key = `${timestamp}-${baseName}.${fileExtension}`;

    // Generate pre-signed URL for upload
    const url = await getSignedUrl(
      r2,
      new PutObjectCommand({ Bucket: bucket, Key: key })
    );

    const headers = {
      "Access-Control-Allow-Origin": "*",
      "Access-Control-Allow-Methods": "PUT",
      "Access-Control-Allow-Headers": "Content-Type",
    };

    return ctx.json({ key, url }, { headers });
  } catch (error) {
    console.error("Error generating pre-signed URL:", error);
    return ctx.json({
      success: false,
      message: `Failed to generate pre-signed URL`,
    });
  }
});
What this code does:
- Gets the original filename from the request
- Creates a unique filename with timestamp
- Generates a pre-signed URL for uploading to that filename
- Returns both the final filename and the upload URL
Step 5: Add Pre-signed URL for Download
Understanding Download Pre-signed URLs
Download pre-signed URLs provide temporary, secure access to files. These URLs expire after a set time for security.
Add Download Endpoint
Find this placeholder code (somewhere at line 63):
// Route to generate pre-signed url for download
files.get("/pre-signed-url/:fileName", async (ctx: ContextExtended) => {});
Replace with this code:
// Route to generate pre-signed url for download
files.get("/pre-signed-url/:fileName", async (ctx: ContextExtended) => {
  try {
    const { r2, bucket } = createR2Client(ctx);
    const fileName = ctx.req.param("fileName");

    if (!fileName) {
      throw new Error("File name is required.");
    }

    // Generate pre-signed URL for download (expires in 15 minutes)
    const url = await getSignedUrl(
      r2,
      new GetObjectCommand({
        Bucket: bucket,
        Key: fileName,
      }),
      { expiresIn: 900 } // 15 minutes
    );

    const headers = {
      "Access-Control-Allow-Origin": "*",
      "Access-Control-Allow-Methods": "GET",
      "Access-Control-Allow-Headers": "Content-Type",
    };

    return ctx.json({ url }, { headers });
  } catch (error) {
    console.error("Error generating pre-signed URL:", error);
    return ctx.json({
      success: false,
      message: `Failed to generate pre-signed URL`,
    });
  }
});
What this code does:
- Gets the filename from the URL parameter
- Generates a pre-signed URL for downloading that file
- Sets expiry time to 15 minutes (900 seconds)
- Returns the temporary download URL
Step 6: Test Pre-signed URLs
Test Pre-signed URL for upload
Start your development server:
npm run dev
Test generating upload pre-signed URL:
# Generate pre-signed URL for upload
curl -X POST http://localhost:8787/files/pre-signed-url \
  -H "Content-Type: application/json" \
  -d '{"fileName": "test-image.jpg"}'
Expected response:
{
  "key": "1234567890-test-image.jpg",
  "url": "https://blazenote.r2.cloudflarestorage.com/1234567890-test-image.jpg?X-Amz-Algorithm=..."
}
Test Using Pre-signed URL
Use the pre-signed URL to upload a file:
# Replace with actual URL from previous response
curl -X PUT "https://blazenote.r2.cloudflarestorage.com/1234567890-test-image.jpg?X-Amz-Algorithm=..." \
  -H "Content-Type: image/jpeg" \
  --data-binary @/path/to/your/test-image.jpg
Test Download Pre-signed URL
Generate download pre-signed URL:
# Replace with actual filename
curl http://localhost:8787/files/pre-signed-url/1234567890-test-image.jpg
Expected response:
{
  "url": "https://blazenote.r2.cloudflarestorage.com/1234567890-test-image.jpg?X-Amz-Algorithm=..."
}
Step 7: Frontend Integration Example
How to Use Pre-signed URLs in Frontend
For file upload:
// 1. Get pre-signed URL from backend
const response = await fetch("/files/pre-signed-url", {
  method: "POST",
  headers: { "Content-Type": "application/json" },
  body: JSON.stringify({ fileName: file.name }),
});

const { key, url } = await response.json();

// 2. Upload file directly to R2 using pre-signed URL
await fetch(url, {
  method: "PUT",
  headers: { "Content-Type": file.type },
  body: file,
});

// 3. Save the 'key' to your database for future reference
For file download:
// 1. Get pre-signed URL from backend
const response = await fetch(`/files/pre-signed-url/${fileName}`);
const { url } = await response.json();

// 2. Use the URL to display or download the file
window.open(url); // Opens file in new tab
Security Considerations
Expiry Times
Recommended expiry times:
- Upload URLs: 5-10 minutes (short-lived)
- Download URLs: 15-30 minutes (longer for user convenience)
- Sensitive files: 1-5 minutes (very short-lived)
Access Control
Additional security measures:
- Validate file types before generating URLs
- Check user permissions before generating URLs
- Log pre-signed URL generation for auditing
- Implement rate limiting on URL generation
Common Issues
"Access denied" errors:
- Verify R2_ACCESS_KEY and R2_SECRET_KEY are set as secrets
- Check that API token has R2:Edit permissions
- Ensure R2_ENDPOINT is correct for your region
Pre-signed URLs not working:
- Verify all environment variables are set correctly
- Check that bucket name matches in all configurations
- Ensure CORS policy allows the required methods
URLs expiring too quickly:
- Adjust the
expiresInparameter ingetSignedUrl() - Consider your use case - balance security vs convenience