File Operations
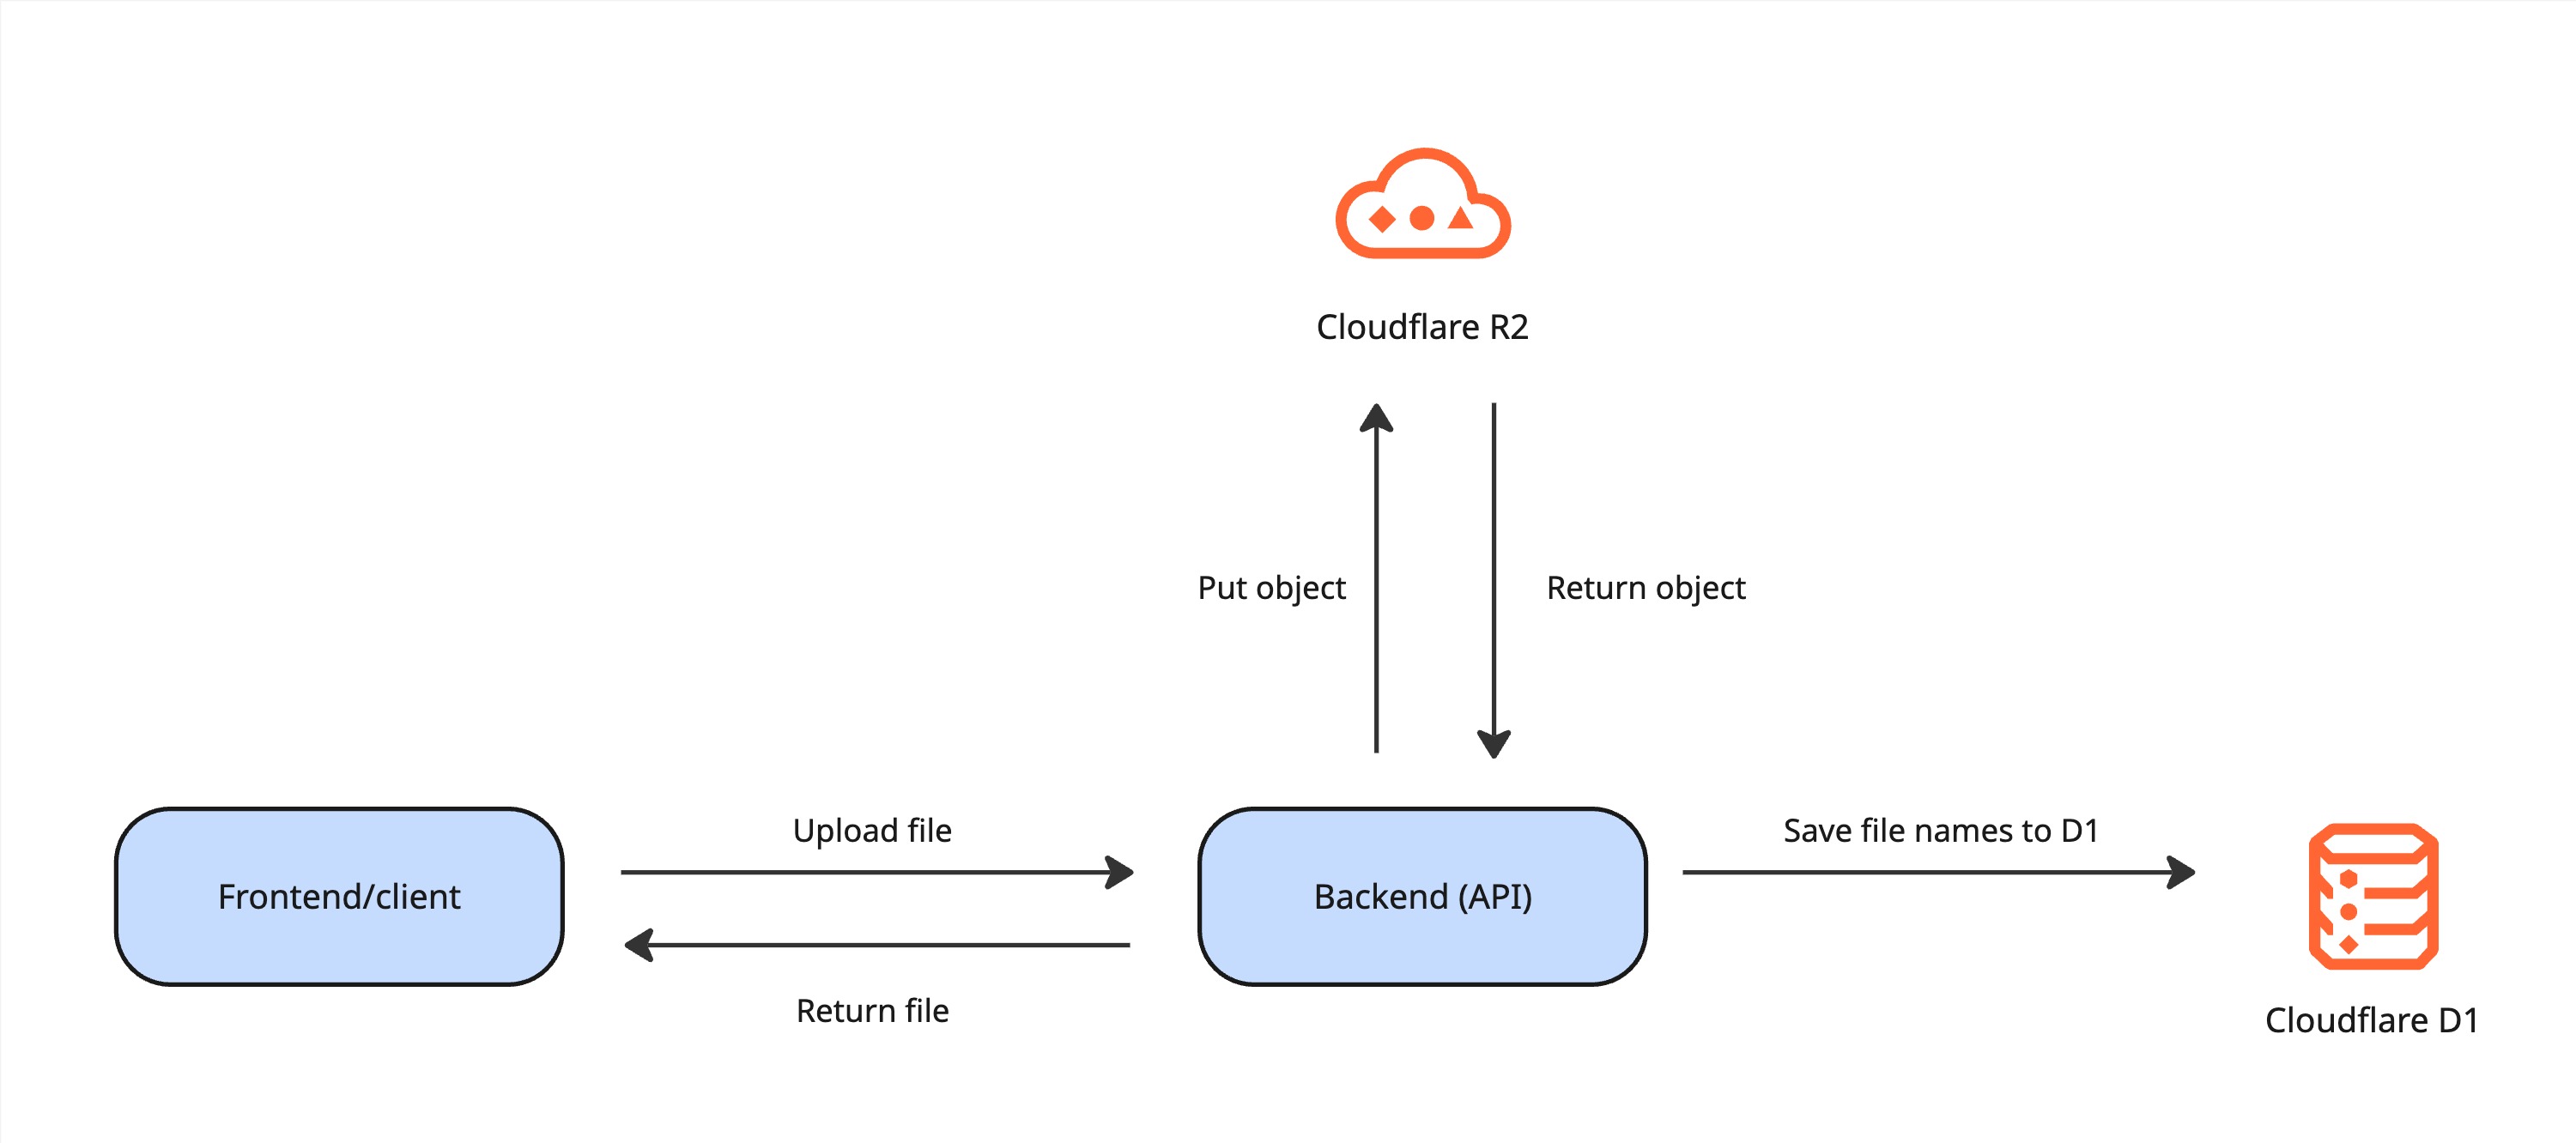
Now that your R2 bucket is set up and secured, you'll implement the core file management functionality. You'll add upload, download, delete, and list operations to your note-taking application.
Understanding File Operations
Your application will have these file-related API endpoints:
| Method | Endpoint | Purpose | What it does |
|---|---|---|---|
POST | /files-workers/upload | Upload a file to R2 | Stores file in bucket |
GET | /files-workers/:key | Download a file from R2 | Retrieves file from bucket |
DELETE | /files-workers/:key | Delete a file from R2 | Removes file from bucket |
GET | /files-workers/list | List all files in R2 | Shows all stored files |
File Naming Strategy
Why unique filenames? To prevent file conflicts, we'll add timestamps to uploaded files:
- Original:
photo.jpg - Stored as:
1234567890-photo.jpg
This ensures each file has a unique name even if users upload files with the same name.
Prerequisites
Before starting, ensure you have completed:
- R2 Bucket Setup - Bucket created and configured
- R2 binding uncommented in
wrangler.toml - CORS policy configured in Cloudflare Dashboard
Verify Your Setup
# Navigate to your backend project
cd ~/projects/blazenote-backend

# Check that R2 binding is configured
grep -A 3 "r2_buckets" wrangler.toml
# Should show uncommented R2 configuration
Step 1: Open the File Routes
Navigate to the file routes:
code src/routes/files-workers.route.ts
Current file structure:
import { Hono } from "hono";

export const filesWorkers = new Hono();

// Placeholder endpoints - we'll implement these
filesWorkers.post("/upload", async (ctx: ContextExtended) => {
  return ctx.json({});
});

filesWorkers.get("/list", async (ctx: ContextExtended) => {
  return ctx.json({});
});

filesWorkers.get("/:key", async (ctx: ContextExtended) => {
  return ctx.json({});
});

filesWorkers.delete("/:key", async (ctx: ContextExtended) => {
  return ctx.json({});
});
Step 2: Implement File Listing
Understanding File Listing
How file listing works:
- Frontend requests list of all files
- Backend queries R2 bucket for all objects
- Backend returns array of filenames
- Frontend can display file gallery or picker
Replace List Endpoint
Find the list endpoint and replace it:
filesWorkers.get("/list", async (ctx: ContextExtended) => {
  return ctx.json({});
});
Replace with this code:
filesWorkers.get("/list", async (ctx: ContextExtended) => {
  const bucket = ctx.env.R2_BUCKET;

  try {
    // Get list of all files in bucket
    const objects = await bucket.list();
    const keys = objects.objects.map((object) => object.key);

    return ctx.json({ success: true, keys });
  } catch (error) {
    console.error("Error listing objects:", error);
    return ctx.json({
      success: false,
      message: "Error listing objects",
    });
  }
});
What this code does:
- Gets reference to the R2 bucket
- Lists all objects (files) in the bucket
- Extracts just the keys (filenames) from the objects
- Returns the list of filenames to the frontend
Step 3: Implement File Upload
Understanding File Upload
How file upload works:
- Frontend sends file via form data
- Backend receives file and validates it
- Backend creates unique filename with timestamp
- Backend uploads file to R2 bucket
- Backend returns success response with filename
Replace Upload Endpoint
Find the upload endpoint and replace it:
filesWorkers.post("/upload", async (ctx: ContextExtended) => {
  return ctx.json({});
});
Replace with this code:
filesWorkers.post("/upload", async (ctx: ContextExtended) => {
  const formData = await ctx.req.formData();
  const file = formData.get("file") as File;

  if (!file) {
    return ctx.json({ success: false, message: "No file uploaded" });
  }

  // Create unique filename with timestamp
  const timestamp = Math.floor(Date.now() / 1000);
  const key = `${timestamp}-${file.name}`;

  try {
    // Upload file to R2 bucket
    await ctx.env.R2_BUCKET.put(key, file, {
      httpMetadata: { contentType: file.type },
    });

    return ctx.json({
      success: true,
      message: "File uploaded successfully",
      filename: key,
    });
  } catch (error) {
    console.error("Error uploading file:", error);
    return ctx.json({
      success: false,
      message: "Error uploading file",
    });
  }
});
What this code does:
- Gets the file from the form data sent by the frontend
- Checks if a file was actually uploaded
- Creates a unique filename using timestamp + original name
- Uploads the file to your R2 bucket with proper content type
- Returns success/failure message to the frontend
Step 4: Implement File Deletion
Understanding File Deletion
How file deletion works:
- Frontend sends delete request with file key
- Backend removes file from R2 bucket
- Backend returns success/failure response
Replace Delete Endpoint
Find the delete endpoint and replace it:
filesWorkers.delete("/:key", async (ctx: ContextExtended) => {
  return ctx.json({});
});
With this implementation:
filesWorkers.delete("/:key", async (ctx: ContextExtended) => {
  const filename = ctx.req.param("key");

  if (!filename) {
    return ctx.json({
      success: false,
      message: "No file key provided",
    });
  }

  try {
    // Delete file from R2 bucket
    await ctx.env.R2_BUCKET.delete(filename);

    return ctx.json({
      success: true,
      message: `File ${filename} deleted successfully`,
    });
  } catch (error) {
    console.error("Error deleting file:", error);
    return ctx.json({
      success: false,
      message: `Error deleting file ${filename}`,
    });
  }
});
What this code does:
- Gets the filename from the URL parameter
- Deletes the file from R2 bucket
- Returns success message
- Handles any deletion errors
Step 5: Implement File Download
Understanding File Download
How file download works:
- Frontend requests file using its key (filename)
- Backend retrieves file from R2 bucket
- Backend returns file with proper content type
- Browser displays or downloads the file
Replace Download Endpoint
Find the download endpoint and replace it:
filesWorkers.get("/:key", async (ctx: ContextExtended) => {
  return ctx.json({});
});
Replace with this code:
filesWorkers.get("/:key", async (ctx: ContextExtended) => {
  const filename = ctx.req.param("key");

  if (!filename) {
    return ctx.json({
      success: false,
      message: "No file key provided",
    });
  }

  try {
    // Get file from R2 bucket
    const file = await ctx.env.R2_BUCKET.get(filename);

    if (file) {
      // Return the file with proper content type
      return ctx.body(file.body, {
        headers: { "Content-Type": file.httpMetadata?.contentType || "" },
      });
    } else {
      return ctx.json({
        success: false,
        message: `File with key ${filename} not found`,
      });
    }
  } catch (error) {
    console.error("Error retrieving file:", error);
    return ctx.json({
      success: false,
      message: `Error retrieving file ${filename}`,
    });
  }
});
What this code does:
- Gets the filename from the URL parameter
- Retrieves the file from R2 bucket using the filename
- Returns the file with correct content type headers
- Handles errors if file doesn't exist
Step 6: Test Your Implementation
Test Local Development
Start your development server:
npm run dev
Test file upload using curl:
# Test file upload (replace with actual file path)
curl -X POST http://localhost:8787/files-workers/upload \
  -F "file=@/path/to/your/test-file.jpg"

# Test file listing
curl http://localhost:8787/files-workers/list
Expected responses:
- Upload:
{"success":true,"message":"File uploaded successfully","filename":"1234567890-test-file.jpg"} - List:
{"success":true,"keys":["1234567890-test-file.jpg"]}
Test File Download
Test downloading the uploaded file:
# Replace with actual filename from upload response
curl http://localhost:8787/files-workers/1234567890-test-file.jpg --output downloaded-file.jpg
Common Issues
File upload fails:
- Check that R2 binding is uncommented in
wrangler.toml - Verify CORS policy includes your development domain
- Ensure file size is within limits
File download returns 404:
- Verify the filename exactly matches what was returned from upload
- Check that file exists in R2 dashboard
- Ensure proper content type is set
List endpoint returns empty:
- Upload a file first to test
- Check bucket name in binding matches actual bucket
Summary
🎉 Excellent work! You've successfully implemented:
- File Upload - Users can upload files to R2
- File Download - Users can retrieve their files
- File Deletion - Users can remove unwanted files
- File Listing - Users can see all their files